Pixelfed DigitalOcean Spaces CDN Configuration
A CDN is a gamechanger for Fediverse instances
Turtle Island Mastodon and now Pixelfed instances have CDNs. It makes a huge difference for performance and storage capacity.
According to DigitalOcean: Spaces Object Storage is an S3-compatible object storage service that lets you store and serve large amounts of data. Each Space is a bucket for you to store and serve files. The built-in Spaces CDN minimizes page load times and improves performance.
For pricing details view here: DigitalOcean Spaces Pricing.
The following instructions assume your Pixelfed instance is already installed and running in a DigitalOcean Linux droplet. Turtle Island uses Cloudron on Ubuntu 22.04 LTS, with two Pixelfed apps running. One for TurtleIsland.buzz and another for Allies.buzz.
The following instructions also assume your domain’s DNS is controlled by DigitalOcean, and you have already subscribed to ‘Spaces Object Storage’.
Creating a Spaces Bucket
Click the ‘Create’ button at the top right of your DigitalOcean console, and select ‘Spaces Object Storage’.
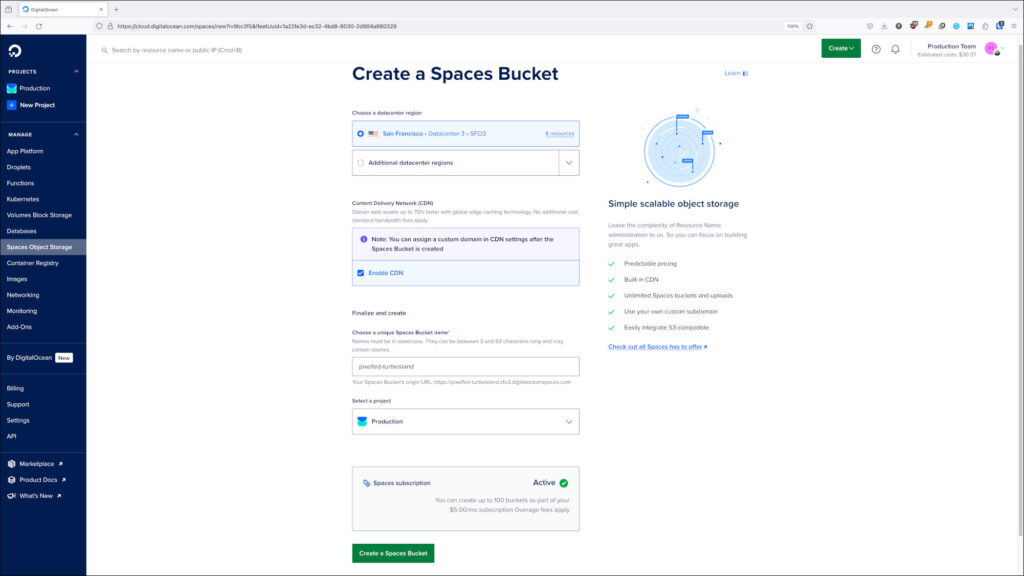
This action leads to ‘Create a Spaces Bucket’ shown in the image above.
- Choose a datacenter region – Preferably the same one your Pixelfed is hosted on
- Content Delivery Network (CDN) – Checkmark ‘Enable CDN’
- Choose a unique Spaces Bucket name – In this example I chose pixelfed-turtleisland
- Select a project – Preferably the same one your Pixelfed is hosted on
- Click the ‘Create a Spaces Bucket’ button at the bottom
Settings Tab
- In the next screen, choose the Settings tab
- File Listing – Leave ‘Restricted’
- CDN (Content Delivery Network) – Choose ‘Change’, then ‘Edit CDN Settings’
- Be sure ‘Enable CDN’ is still checkmarked and click ‘Add a new subdomain certificate’
Add a Custom Subdomain
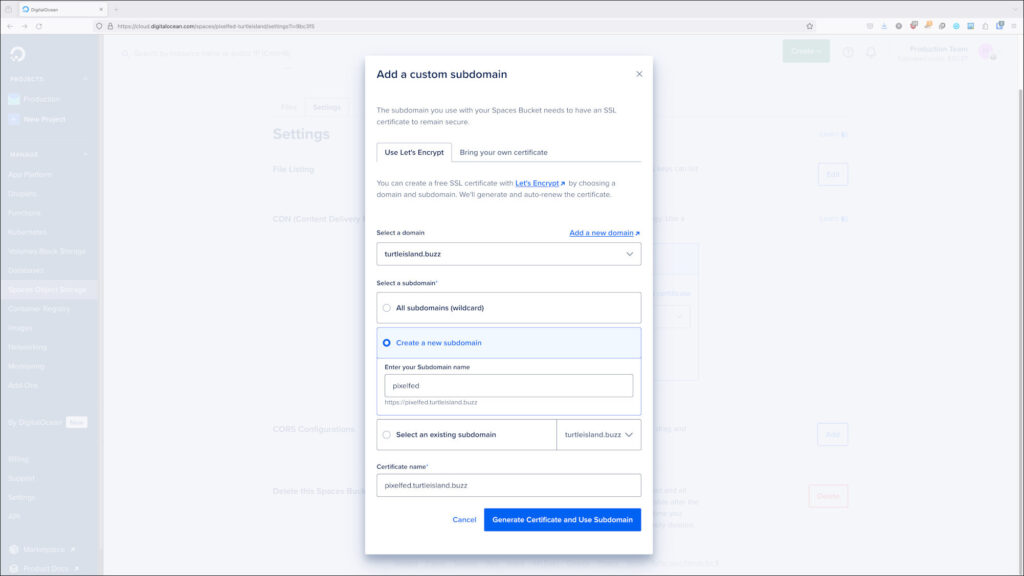
- On the ‘Use Let’s Encrypt’ tab, Select a domain and choose your domain
- Select a subdomain – Create a new subdomain, I added ‘pixelfed’
- Certificate name – I added the subdomain ‘pixelfed.turtleisland.buzz’
- Then click the ‘Generate Certificate and Use Subdomain’ button
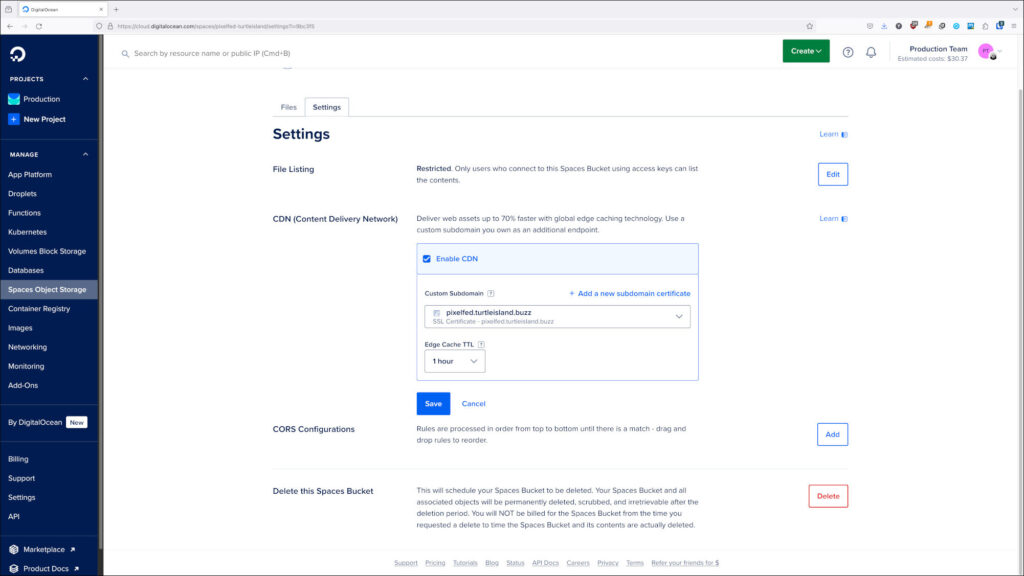
When that is done, click the ‘Save’ button.
CORS Configurations
CORS Configurations – Choose ‘Add’.
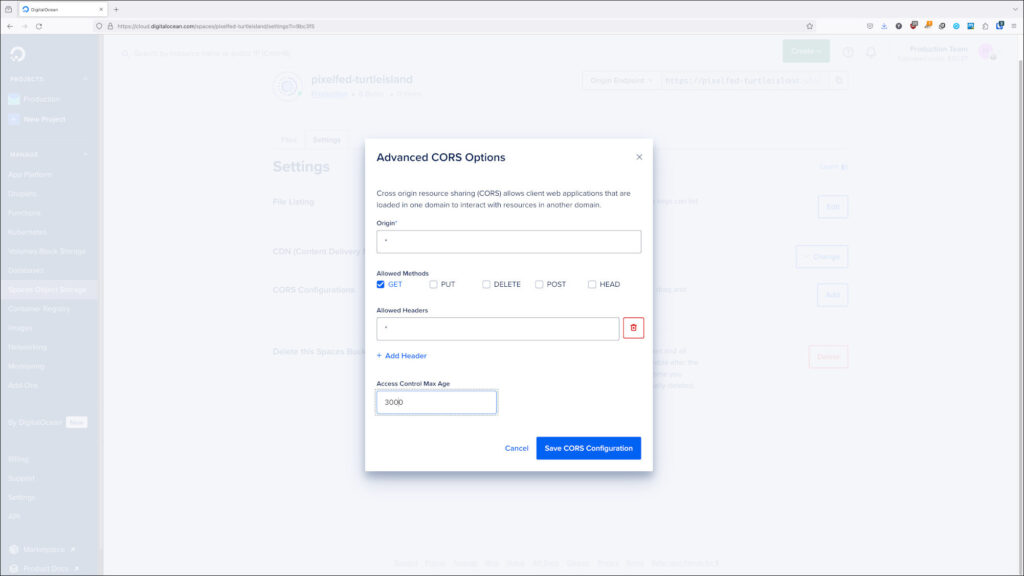
Set the following in the Advanced CORS Options dialog:
- Origin – ‘*’
- Allowed Methods – Checkmark ‘GET’
- Allowed Headers – Click ‘Add Header, add ‘*’
- Access Control Max Age – ‘3000’
Then click the ‘Save CORS Configuration’ button.
You can now upload a file (be sure to set file permissions to ‘public’ and test your CDN. My test is https://pixelfed.turtleisland.buzz/TurtleIsland.social-Mishiikenh-Kwe-Saabe-Dream-1337×675.jpg
Spaces Access Keys
You need access keys. To generate Spaces access keys:
- Click ‘API’ on the bottom left side of the DigitalOcean control panel
- Click the ‘Spaces Keys’ tab
- Click the ‘Generate New Key’ button
- Name – I chose pixelfedbuzz
- Click the ‘Create Access Key’ button
At this point the Spaces configuration is done, now on to configure Pixelfed to use the CDN.
Pixelfed Configuration
## DO Spaces
PF_ENABLE_CLOUD=true
FILESYSTEM_CLOUD="spaces"
AWS_URL="https://pixelfed.turtleisland.buzz"
DO_SPACES_KEY="***"
DO_SPACES_SECRET="***"
DO_SPACES_ENDPOINT="https://sfo3.digitaloceanspaces.com"
DO_SPACES_REGION="sfo3"
DO_SPACES_BUCKET="pixelfed-turtleisland"
DO_SPACES_ROOT=""- Edit the above to your specifics
- Do not edit PF_ENABLE_CLOUD=true
- Do not edit FILESYSTEM_CLOUD=”spaces”
- Edit AWS_URL= “edit this” to your subdomain
- Edit DO_SPACES_KEY= “edit this” to your key
- Edit DO_SPACES_SECRET= “edit this” to your secret key
- Edit DO_SPACES_ENDPOINT=”edit this” to your endpoint
- Edit DO_SPACES_REGION=”edit this” to your region
- Edit DO_SPACES_BUCKET=”edit this” to your bucket
- Do not edit DO_SPACES_ROOT=””
- Add to the end of production.env (or .env on non-Cloudron instances)
- Restart Pixelfed
In the Pixelfed UI Admin Settings menu
- Checkmark the new ‘Cloud Storage’ option
- Save
- Restart Pixelfed (Not sure this is necessary but can’t hurt)
And there you go!
Now do a test image post, and then check your Space Files tab to confirm the image has been written to the CDN.
Thanks!
-Yehuda
This page is subject to content updates/additions. If you think any content should be updated or added, please leave a private comment on Mastodon – TurtleIsland.social/@Yehuda.
Follow on Mastodon – TurtleIsland.social/@Yehuda